
No1 Roofing Quick-Dek700™
Introducing No.1 Quick-Dek700™, the latest advancement in concealed fixed roofing and wall cladding from No.1 Roofing & Building Supplies. No.1 Quick-Dek700™ is a high-performance concealed fixed decking system designed for commercial, industrial and residential roofing applications.
Engineered for strength, weather resistance, and rapid installation, Quick-Dek700™ combines wide-span capability, deep rib design, and advanced clip technology to deliver superior performance in diverse environments.

Product Navigation
No.1 ROOFING QUICK-DEK700™
- CHARACTERISTICS AND BENEFITS
- PANEL DIMENSIONS
- COMPLIANCE WITH NATIONAL CONSTRUCTION CODE
- NO.1 QUICK-DEK700™ - SYSTEM SPECIFICATION
- CLIP & FIXING DETAILS
- SPAN & LOAD CAPACITY
- DESIGN & PERFORMANCE
- PREPERATION & INSTALLATION
- DO'S & DON'TS
- INSULATION & SAFETY MESH
- OIL CANNING
- MATERIAL HANDLING AND STORAGE
- APPLICABLE AUSTRALIAN STANDARDS
- WARRANTY
- DISCLAIMER
Characteristics and Benefits
No.1 Quick-Dek700™ is an Australian Made high-quality roofing solution, that ensures reliability tailored to local conditions. Its deep rib profile enhances load capacity and promotes efficient water drainage, even on slopes as low as 1º pitch.
The clip Fixing system provides unmatched wind uplift resistance with a secure 4-point fastening mechanism. For improved comfort, it offers thermal and noise reduction when paired with insulation. Additionally, it is fully NCC compliant and my be used wherever a non-combustible material is required.
Finally, is wide coverage means fewer sheets are needed, signi cantly speeding up installation while maintaining superior performance.
Panel Dimensions

No.1 QUICK-DEK700™ - System Specification
Profile Dimensions:
- Cover Width: 700mm
- Rib Height: 40mm
- Minimum Roof Pitch: 1 degree
Material Specifications:
- Base Metal Thickness (BMT): Available in 0.42mm and 0.48mm
- Steel Grade: High Tensile G550 ZINCALUME® steel
Colour Options:
A wide range of finishes, including all COLORBOND® colours, and ZINCALUME® steel.
Spanning Ability:
Designed for wide support spacings, reducing the number of purlins required
Water Carrying Capacity:
Excellent, ensuring effective drainage
Non-Combustible:
Meets the latest building code requirements for fire safety
Weather Tightness:
Enhanced by anti-capillary side laps and concealed clip fixing method (no panel piercing)
Lightweight:
Easy to handle and install, reducing labour costs and time
Custom Lengths:
Available in custom cut lengths to suit specific project requirements
Packing:
Supplied in strapped bundles of up to 1 tonne for easy transportation and handling
Applications:
- Roofing: Suitable for roof pitches as low as 1 degree, ideal for modern architectural designs.
- Wall Cladding: Provides a sleek, contemporary look for both commercial and residential buildings.
Clip & Fixing Details
Clip Details:
- Made from high quality galvanised material - fully non combustible.
- Clips should be properly lapped and fixed with recommended fasteners through existing screw holes.
- All four screw holes in each clip must be fastened.
- If a clip is cut as to follow a cut panel, the remaining section must have all available holes secured, with a minimum of two fasteners.
- Inadequate Fastening compromises performance and may void warranties.
Clip Dimensions:

Recommended Fasteners for clips (3 per clip):
- Fixing to timber: 12 x 40mm Hex Head Type 17 screws
- Fixing to metal: 12 x 30mm Steel Fix Hex Head Screws
Important: Do NOT use wafer head screws, only hex head type.
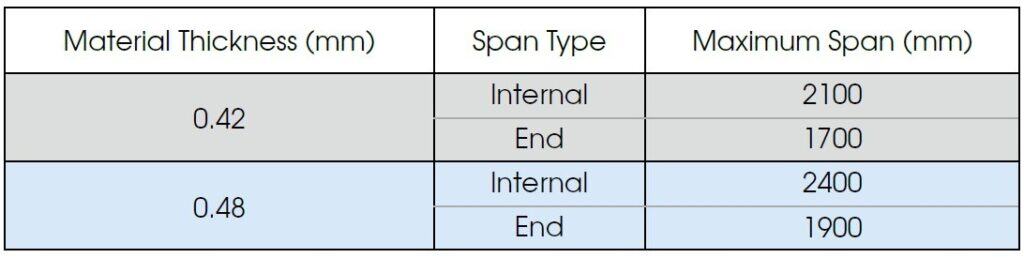
Span & Load Capacity
Span Chart:
| 1.5mm+ thick supports | 1.2mm thick supports | 1.0 thick supports | ||||||||||
| 0.42 BMT | 0.48 BMT | 0.42 BMT | 0.48 BMT | 0.42 BMT | 0.48 BMT | |||||||
| Roofs | int | end | int | end | int | end | int | end | int | end | int | end |
| N1 | 2100 | 1700 | 2400 | 1900 | 2100 | 1700 | 2400 | 1900 | 2100 | 1700 | 2400 | 1900 |
| N2 | 2100 | 1700 | 2400 | 1900 | 2100 | 1700 | 2400 | 1900 | 2100 | 1700 | 2400 | 1900 |
| N3 | 1450 | 1150 | 2350 | 1850 | 1450 | 1150 | 2300 | 1850 | 1450 | 1150 | 2150 | 1700 |
| N4 | 900 | 1050 | 900 | 1050 | 900 | 1050 | ||||||
| Walls | ||||||||||||
| N1 | 3000 | 2400 | 3000 | 2400 | 3000 | 2400 | 3000 | 2400 | 3000 | 2400 | 3000 | 2400 |
| N2 | 3000 | 2400 | 3000 | 2400 | 3000 | 2400 | 3000 | 2400 | 3000 | 2400 | 3000 | 2400 |
| N3 | 2350 | 1850 | 3000 | 2400 | 2350 | 1850 | 3000 | 2400 | 2350 | 1850 | 2850 | 2250 |
| N4 | 1300 | 1000 | 1900 | 1500 | 1300 | 1000 | 1900 | 1500 | 1300 | 1000 | 1900 | 1500 |
Notes:
- Table based on tests done to AS 1562.1 .
- Table gives the minimum value of Serviceability, Strength and Foot traffic (for roofs).
- The "N" wind categories are based on AS 4055 and includes an allowance for edge areas.
- For roof pitches less than 10 degrees, use the next highest "N" category in corner areas.
Wind Load Chart:
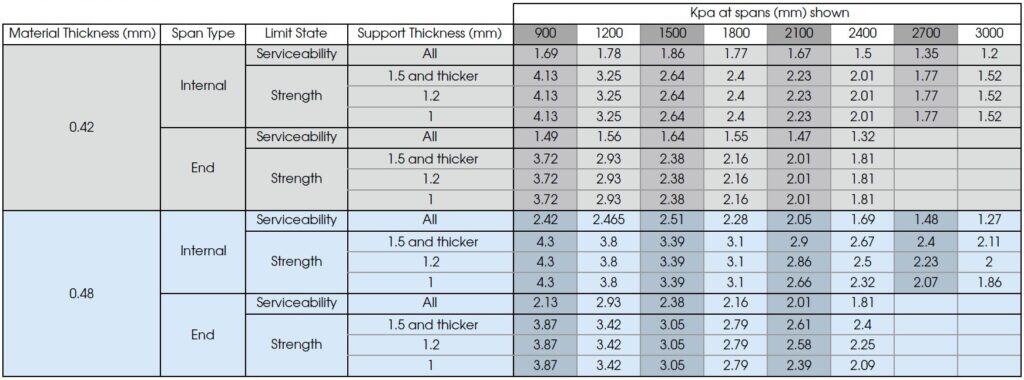
Notes:
- Table based on tests done to AS1562.1, AS4040 parts 0,2 and 3 and the NCC.
- For timber battens/purlins use values from 1.5mm and thicker.
- Timber fasteners should be #12 size and penetrate the timber by more than 25mm for hardwood and 35mm for softwood.
- Metal battens/purlins are produced from hi-tensile steel.
- Metal fasteners are #12 x 30mm hex head self drilling, self tapping screws.
- For best results, reduce end spans to 80% that of internal spans.
- Equal span systems should be designed using end span values.
Foot Traffic:
Notes:
- Table based on tests done to AS 1562.1
- Foot traffic limits based on AS 1170.1 for R2- other roofs.
- When walking on the roof, wear flat rubber soled shoes and walk only in the trays.
Design & Performance
Water Drainage & Slope:
- Minimum slope: 1º for most applications.
- Extended roof runs possible - please contact No.1 Roofing & Building Supplies for further assistance.
| Rainfall Intensity (mm/h) | Roof Slope (deg) | |||||
| 1 | 2 | 3 | 5 | 7.5 | 10 | |
| 100 | 284 | 357 | 414 | 509 | 606 | 690 |
| 150 | 189 | 238 | 276 | 339 | 404 | 460 |
| 200 | 142 | 178 | 207 | 254 | 303 | 345 |
| 250 | 113 | 143 | 166 | 203 | 242 | 276 |
| 300 | 95 | 119 | 138 | 170 | 202 | 230 |
| 350 | 81 | 102 | 118 | 145 | 173 | 197 |
| 400 | 71 | 89 | 104 | 127 | 151 | 172 |
Thermal Movement & Noise Control:
Metal roof sheets naturally expand and contract with temperature changes, with darker-coloured panels experiencing greater movement due to higher heat absorption. This increased expansion can lead to more noticeable noise as the panels adjust.
To manage this, recommended maximum sheet lengths should be followed - and since darker tones expand more, they should typically be kept shorter than lighter-coloured panels. This helps reduce stress on fixings and minimises noise from thermal movement.
Maximum recommended sheet lengths:
- Flat Roofs - 42m (light colours) / 28m (dark colours)
- Spring Curved Roofs - 30m (light colours) / 20m (dark colours)
Noise Reduction Tips:
- Use light-coloured sheeting and steel supports
- Install insulation behind sheets (up to 100mm with roof raisers)
- Ensure clip spacing ≥1600mm to minimise thermal noise
Compatibility & Environmental Suitability
- Avoid contact with copper, lead, treated timber or uncoated stee
Optional Rib Protection
To optimise space during delivery, Quick-Dek700™ panels may be stacked, which can lead to surface markings during transport of panels. To minimise this risk, Quick-Dek700™ can be manufactured with the optional plastic protection film applied to the ribs of panels. This fils acts as a barrier against friction marks.
Obs.: Plastic protection lm application is non standard, and is applied by request only.

IMPORTANT: The protective plastic film must be peeled off immediately after panel installation while the adhesive remains pliable. Delayed removal or prolonged exposure to sunlight may cause the film to bond more firmly to the panel surface, making subsequent removal difficult and potentially leaving adhesive residue. For optimal results, remove all plastic protection as soon as installation is complete.
Preparation Measures:
Before Installing Quick-Dek700™
- Ensure Compliance with OH&S regulations throughout the installation
- Wear cut resistant gloves at all times when handling Quick-Dek700™ sheets and auxillary flashings
- Wear rubber-soled shoes when working on heights
- Rotate sheets on the ground ensuring the sheets are aligned in the direction of lay before lifting - the sheet overlap edge needs to face the roof edge where the installation will start

- Always lift sheet bundles onto the roof structure safety. lower onto film supports distributing the bundle weight evenly over the structure, do not point load at mid-span of the roof structure as this is dangerous and may result in damage to the structure and bridging supports
- Ensure structure or cladding support is secure and ready for panel installation
- Confirm sheets supplied are the correct length without excessive length overhang
- Check the roof pitch is within sheet design, with a minimum 1º pitch slope
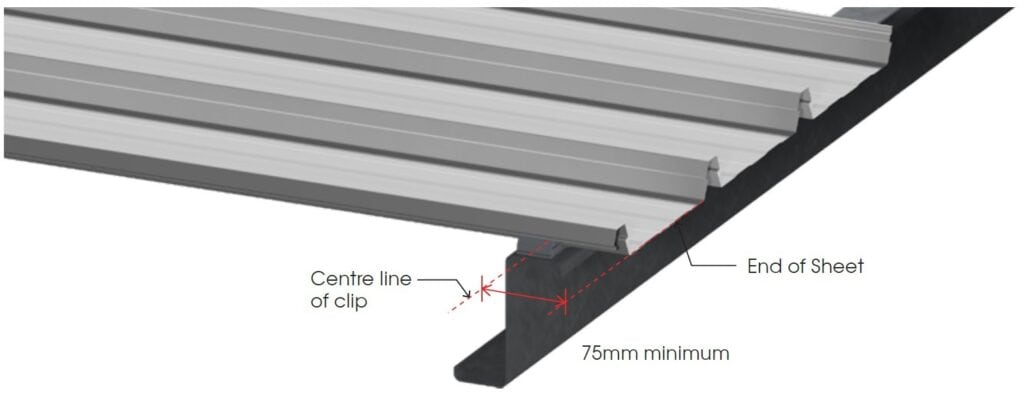
- Quick-Dek700™ clips should be no less than 75mm from sheet ends
- Ensure sheet set-out is correct
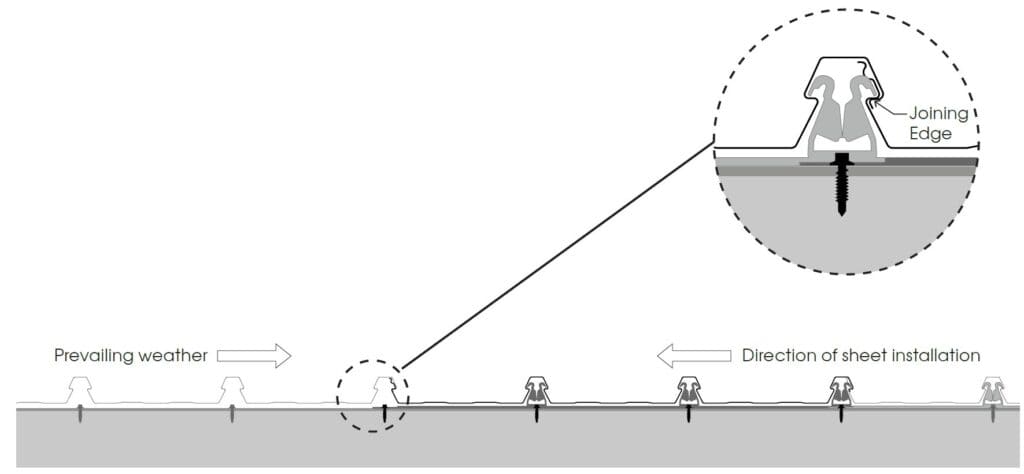
- Wherever possible, install the sheets so that the joining edge is not facing prevailing weather
Installation Procedure:
1. SAFETY FIRST: Ensure safety mesh and insulation are installed according to manufacturer’s instructions.
2. Using a string line, ensure the Quick-Dek700™ clips are fixed in alignment to the roof edge, facing the direction of lay as shown on the illustration.
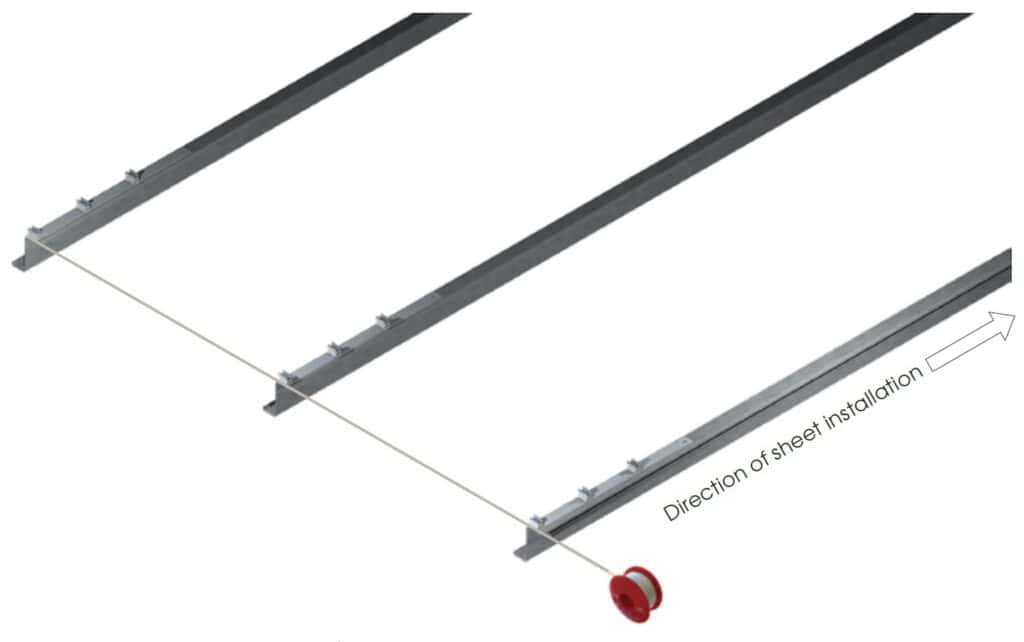
3. Fix the hex-head tek screws through the Quick-Dek700™ clips, onto the roof structure support.
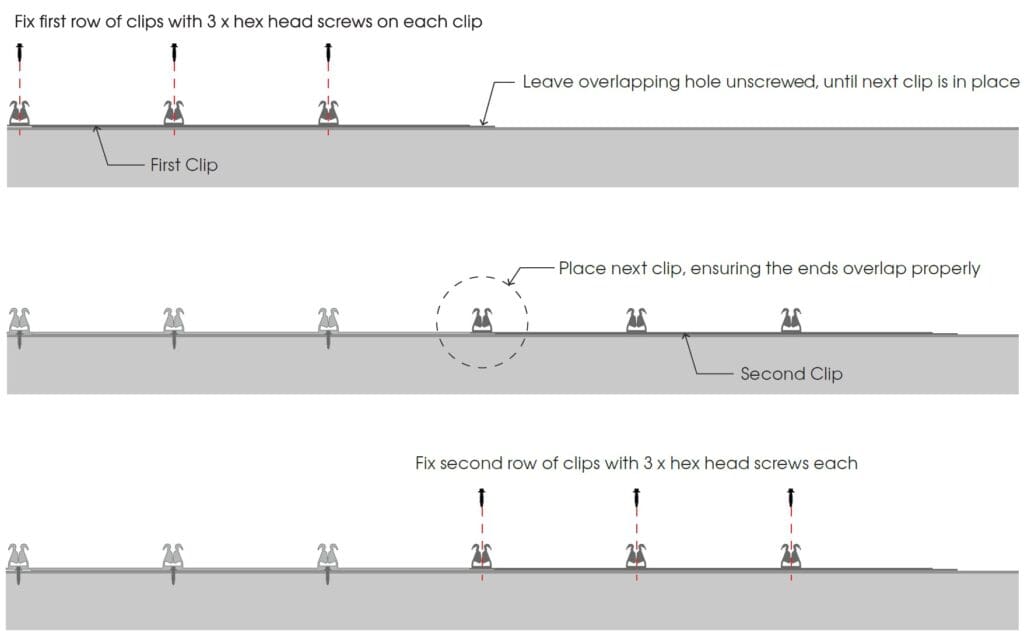
4. After all the first row of Quick-Dek700™ clips have been aligned and fixed to the roof structure along the roof edge, connect and fix the second row of Quick-Dek700™ clips. There should be at least two rows of clips installed in advance before Quick-Dek700™ sheets are installed.
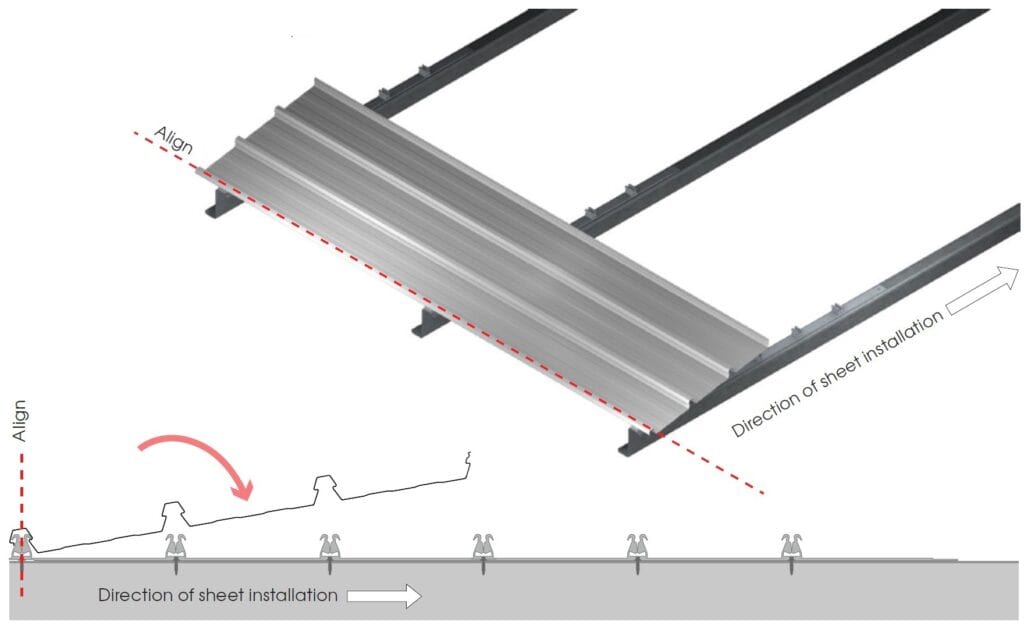
5. Position the first sheet on the first row of Quick-Dek700™ clips, ensuring sheet edge is in line with the first row of clips.
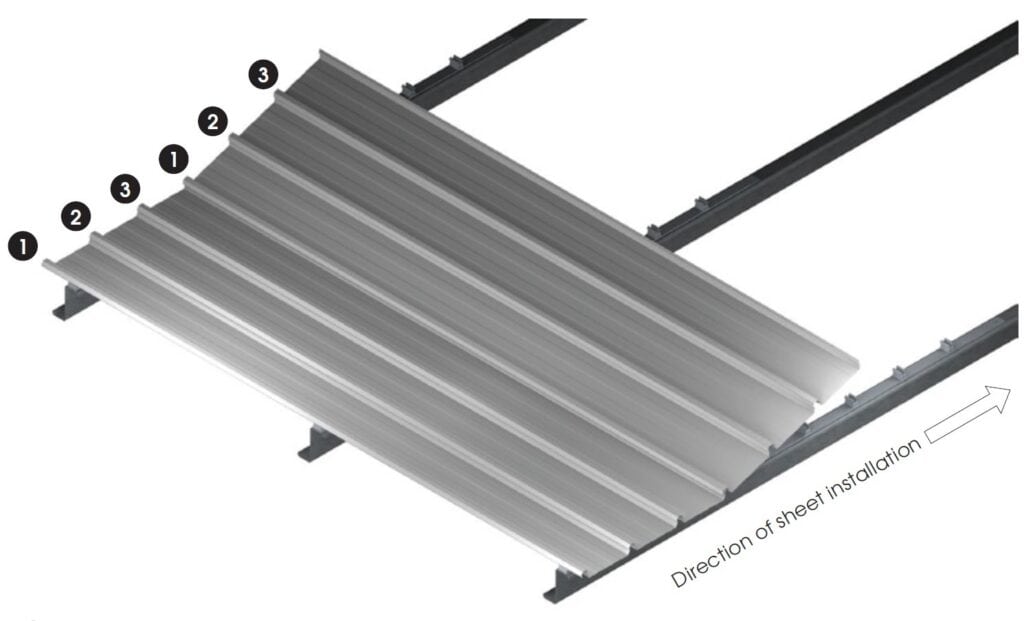
6. IMPORTANT: snap the sheet down onto the Quick-Dek700™ clips 6. in the following order:
a. Start with the leading sheet edge RIB 1 and RIB 2, walk along the length of the sheet snapping the sheet ribs onto the Quick-Dek700™ clips, working across the sheet in the direction of lay (sheet installation direction), walk along RIB 3 snapping the sheet rib onto the Quick-Dek700™ clips.

Obs: Snap ribs onto clips in sequence 1 - 2 - 3. Listen for the audible "click" to confirm secure fit.
DO NOT FORCE; SHEETS SHOULD ENGAGE SMOOTHLY

b. Continue to lay at least two rows of clips in advance along the roof structure.
c. Position the next sheet taking care to engage the overlay sheet edge RIB 1 first - note: always engage and snap the sheet ribs in the direction of lay.
7. Install all Quick-Deck700™ clips and sheets following steps on point 6
8. If the last sheet and clips are less than a full sheet width, the sheet and clips can be cut as required.
Do’s & Don’ts
Do:
- Walk only in pans (between ribs) or directly above supports.
- Snap ribs onto clips in order 1 - 2 - 3.
- Use hex-head screws only (no wafer heads).
- Clean debris and swarfs from roof immediately after installation.
Don’t:
- Walk on ribs or unsupported underlaps.
- Use excessive force to engage sheets.
- Use abrasive cutting tools (burrs will damage the sheet coating).
Insulation, Safety Mesh & Translucent Sheets
Insulation:
To enhance Quick-Dek700™ performance, thermal and acoustic insulation can be installed under the roof sheets (ie.: foil-faced blanket).
- For blankets ≤80mm: Clip rail compresses insulation automatically
- For thicker insulation (100mm+): Use roof raisers between clips and blanket.
Enquire within for roof raiser options.
Safety Mesh:
For most Quick-Dek700™ installations, the use of safety mesh is highly recommended. Safety mesh provides a critical layer of protection for workers during installation, preventing falls and enhancing overall site safety. It also supports insulation materials, ensuring they remain in place and function effectively.
By incorporating safety mesh, you not only comply with safety regulations but also improve the durability and performance of your roofing system. Always ensure that the safety mesh is installed correctly and securely before proceeding with the decking installation.
Translucent Sheets:
Fibreglass translucent sheets are an excellent option for bringing natural light into buildings, enhancing the interior environment while reducing the need for artiicial lighting.
These sheets can be seamlessly combined with Quick-Dek700™ sheets, providing a cohesive and eicient roofing solution.
For more information on integrating fibreglass translucent sheets with your Quick-Dek700™ installation, please enquire within.
Obs.: Never step on fibreglass sheets, as they may not have the structural strength to support heavy weight.
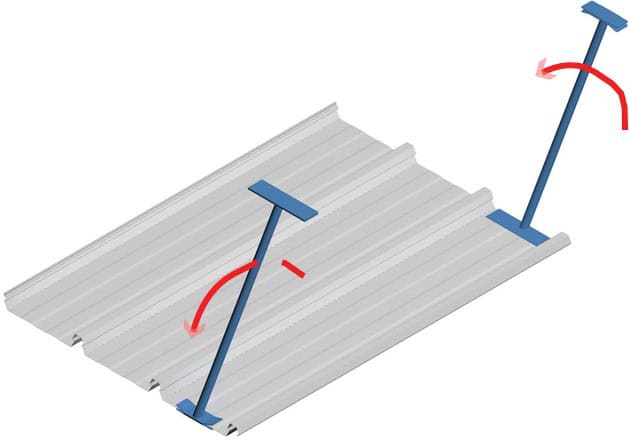
Turn up and turn down Quick-Dek700™ panels
Turning the panel ends up or down are important steps for enhancing and ensuring overall panel performance.
It must be done with the use of specialised tools, and work in the following way:
- Turning Up - Turning the panel pan up is a technique used at ridge level to help prevent wind-driven rain from entering the roof system at the ridge. By turning the panel up, you create a barrier that blocks water from being forced under the metal panels.
- Turning Down - Turning the panel down at the gutter line helps direct water into the gutters, preventing it from running back under the roof panels due to capillary action.
Turn up:
Using the turn up side of a turning tool, fold the upper end of each pan at approximately 45 degrees fold, being careful not to pierce the panel.
Turn down:
Using the turn down side of a turning tool, fold the lower end of each pan at approximately 45 degrees fold, being careful not to pierce the panel.
Obs.: For extra weather protection, infill strips (bottom or top) can also be incorporated at sheet ends. For more information on our infill strip range, please enquire within.
Oil Canning
Whilst usually undesirable, oil canning is a common natural occurrence to all metals and results from the natural movement of the panel caused by its expansion and contraction once exposed to temperature variation.
No1 Architectural Panel Systems takes all possible measures to manufacture panels with maximum quality control resulting in an aesthetically flat looking panel, and for this reason oil canning on installed panels will not be considered a cause for panel rejection.
Please speak to No1 for assistance on how to mitigate oil canning on your installation.
Material Handling and Storage
Proper handling and storage of No.1 metal roof and wall cladding products are essential to maintain their quality and longevity. Follow these guidelines to ensure optimal performance:
Storage:
- Store sheet packs undercover and off the ground to protect them from moisture. Use tarpaulins or similar covers to shield the materials from rain and condensation.
- Avoid storing materials in areas where they may be exposed to corrosive environments or chemicals.
- Ensure good ventilation around stored materials to prevent condensation buildup.
Handling:
- Wear clean, dry, cut-resistant gloves when handling steel products to avoid damage to the surface finish.
- Do not drag sheets over rough surfaces or over each other to prevent scratching.
- Carry tools and equipment rather than dragging them across the sheets.
Applicable Australian Standards
Installation of No.1 Quick-Dek700™ must comply with the following Australian Standards:
- AS 1562.1:2018 - Design and Installation of Sheet Roof and Wall Cladding – Metal
This standard provides guidelines on best practice design and installation techniques for metal roofing and wall cladding, including material quality, fastening techniques, and load-bearing aspects.
- AS 4040.0:1992 - Methods of Testing Sheet Roof and Wall Cladding – Introduction, List of Methods, and General Requirements.
This standard outlines the testing methods for assessing the performance of sheet roof and wall cladding under various conditions.
- SA HB 39:2015 - Installation Code for Metal Roof and Wall Cladding
This handbook provides detailed information on the selection, performance, and installation of metal roof sheeting and wall cladding, ensuring a weatherproof exterior and proper drainage.
By adhering to these standards, you can ensure that your installation meets the required safety, performance, and durability criteria, providing peace of mind and long-term reliability.
Compliance with National Construction Code
No.1 Quick-Dek700™ has been extensively tested and is fully compliant and certified to Australian Standards, including testing and certification to AS1562.1. Certificate of Compliance can be provided.
Warranties
The Quick-Dek700™ material warranty is directly tied to the warranty provided by the coil manufacturer, as we produce our decking solely from base metal in coil form. Warranty terms and conditions are dictated by the coil manufacturer.
Warranties can be provided on a project basis, and clients are encouraged to contact us to discuss specific warranty details for their projects.
Limitations of Liability
To the extent permitted by law, our company will not be liable for any direct or indirect loss or damage (including, but not limited to, consequential loss or damage such as loss of profit, loss of use, damage to goodwill, and delays) arising from the use of this publication, regardless of the cause (including breach of contract, negligence, or statutory breach).
Disclaimer
The information provided in this manual is intended as a guide only. No.1 Roofing & Building Supplies does not accept any liability for any loss or damage caused by the use of this information.
It is the responsibility of the installer to ensure that all products are installed in accordance with the relevant Australian Standards and building codes. No.1 Roofing & Building Supplies reserves the right to change product specifications without notice.
Click here for the full product description, specifications and features for NO1 ROOFING Quick-Dek700™.
2025 No.1 Roofing & Building Supplies. All rights reserved.
Quick-Dek700™ is a registered trademark.